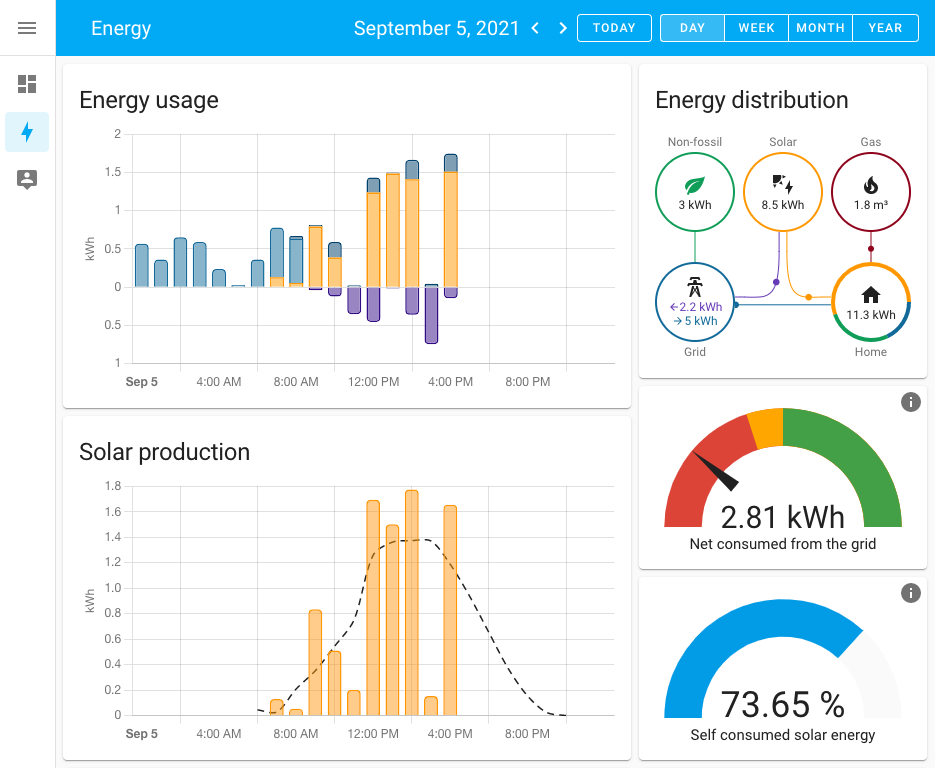
Back in the August 2021 release of Home Assistant, Energy Management for your home was introduced. This system combines energy delivery, energy production, energy storage, and energy usage into one single pane of glass allowing users to be more thoughtful about their energy usage.
They released a blog post outlining the few ways to start getting this data into Home Assistant, but most of them surrounded Solar array systems as well as utility meters that are more common in Europe rather than the United States. They also suggest CT Clamp Meters (which can be dangerous to install) or gathering the data directly from your utility via an integration.
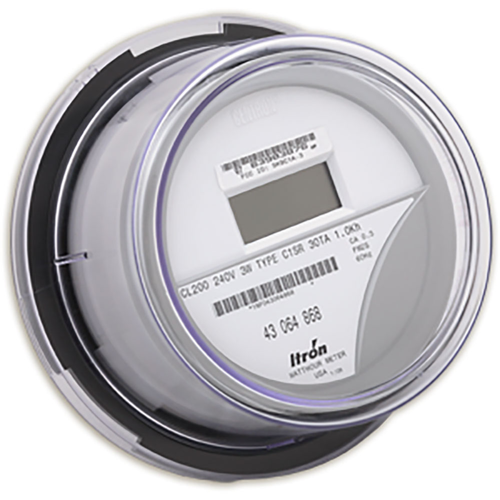
The next question you might want to ask yourself: does your local utility use AMR or Automated Meter Reading Meters? How does your local utility read your meter? In most cases, utilities install AMR meters at the customer's home, which broadcast the meter reading data over radiofrequency. Your utility then has crews that drive around the service territory with special receiving equipment and collect the meter information as they drive by.
AMRIDM2MQTT: Send AMR/ERT Power Meter Data Over MQTT
You might be wondering, can I receive these broadcasts too? Yes! using a very inexpensive Software Defined Radio USB adapter, you too can receive your own Meter's data!
Head on over to my friend RagingComputer's Blog Post on this. He did most of this groundwork back in 2016 when he was working with OpenHAB. Check out his information there and see if your meter is one of the supported AMR meters. Since he created this project, he's switched over to Home Assistant and re-wrote his AMR program to output to MQTT so we can use it in Home Assistant or any other application that uses MQTT.
Go ahead and get yourself set up following the documentation in the AMRIDM2MQTT Github project.
If you need a better antenna for your SDR, I recommend this kit, which offers several options. I've had great luck with these.
Home Assistant Setup
Once you're set up with AMRIDM2MQTT and you can see your IDM messages coming in, let's set up an MQTT sensor in Home Assistant to receive the data:
sensor:
- platform: mqtt
state_topic: "readings/<YOUR METER ID>/meter_reading"
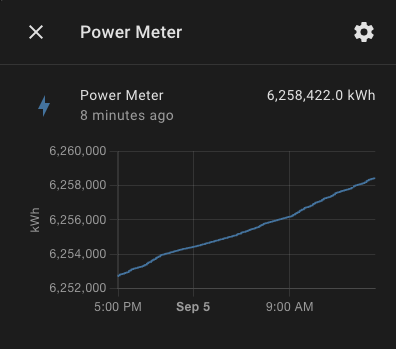
name: "Power Meter"
unit_of_measurement: kWh
last_reset_topic: "readings/<YOUR METER ID>/meter_reading"
last_reset_value_template: 1970-01-01T00:00:00+00:00
value_template: "{{ (value | float) /100 }}"
state_class: total_increasing
device_class: energy
The last_reset_topic, last_reset_value_template, state_class, and device_class are required so the sensor is supported by the new Energy Management system.
Restart Home Assistant and you should start to see your utility's meter data start to appear. Here's a screenshot of mine, it's been running for quite a while. As you can imagine, the meter will simply report an incrementing number so all you will see in the regular attribute metrics is an ever-increasing stair-step pattern.
Energy Management System
Navigate to the Energy page and start the setup process. You should see the MQTT sensor entity we set up earlier in the drop-down list to select your electricity grid consumption sensor
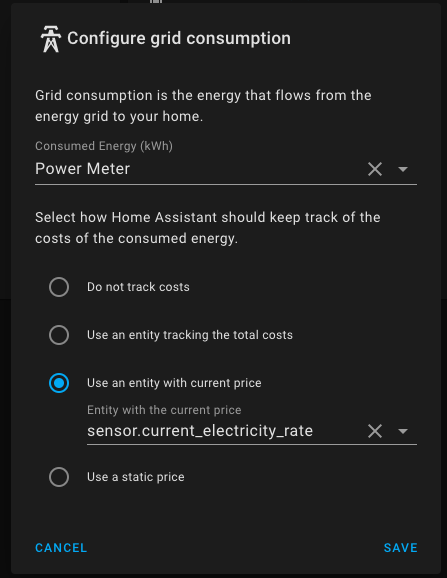
If you want to track the cost of your energy usage, go ahead and put in the rate that your utility charges you.
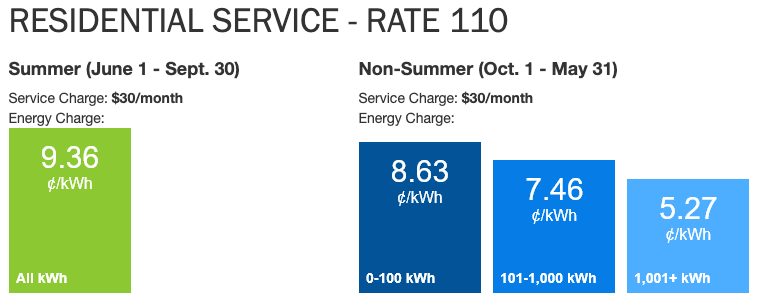
Mine is 9.36 cents per kWh in the summer and in the off-summer months it's slightly less at 8.36. There are some neat ways you can set your cost correctly like this. I made a template sensor so that this will change dynamically with the months and used the "Use an entity with the current price" option. Eventually, I'll look into using the Utility Meter integration to properly calculate my tariffs in the winter so the price is more accurate based on kWh usage, but I'll error on the side higher cost for now.
template:
  - sensor:
      - name: "Current Electricity Rate"
        unit_of_measurement: "USD/kWh"
        device_class: monetary
        state: >
            {% set today = states('sensor.date').split('-') %}
            {% set month = today[1]|int %}
            {% if month in [10, 11, 12, 1, 2, 3, 4, 5] %}
             0.0836
            {% elif month in [6, 7, 8, 9] %}
             0.0936
            {% endif %}
This template sensor takes the month from sensor.date and performs an if/else statement for what my monthly electricity rate should be based on the rate manual from my local utility.
Save this panel and wait about an hour or so for the data to start collecting.
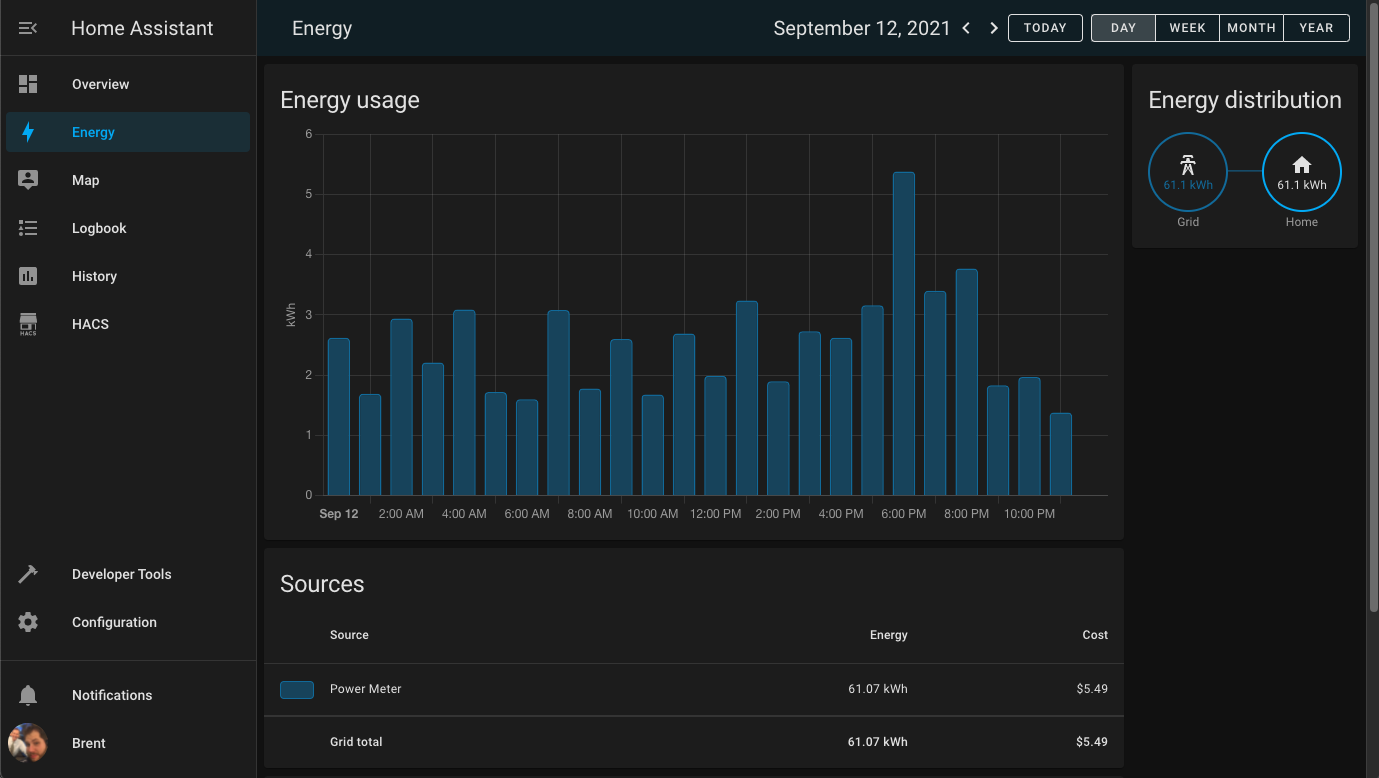
Eventually, you will start to see your kWh usage begin to populate! Go ahead and add additional energy monitoring for individual devices if you would like. The TP-Link HS110 and KP115 switches are supported by the Energy Management system out of the box.
Check out my other posts on Home Automation and other Smart Home technologies here!
Hope this helps!