I recently became a first time homeowner and like most people I've been allured by the Ring Video Doorbell. Despite the steep price, I have thoroughly considered purchasing one and after plenty of homework I decided that the Ring Doorbell wasn't for me. There are 3 main reasons why I do not like the Ring:
- Ring is an entirely closed system, they do not have a public API so you can't programmatically utilize the Doorbell's features for any of your own systems or tinkering
- The device is completely useless without internet access.
- There is no local access to a direct video stream from the HD camera for you to use with a local Network Video Recorder such as Synology's Surveillance Station.
Short of the camera, I still want doorbell alerts whenever the doorbell is rang.
So how did I make my doorbell smart for about $27?
First lets start off with a little background on how a standard, wired doorbell works:
When you press a doorbell button, you complete an electrical circuit that allows household electricity to flow through the doorbell's internal electromagnet. The magnetic field generated by the electromagnet is then used to power a mechanism that creates the doorbell sound.
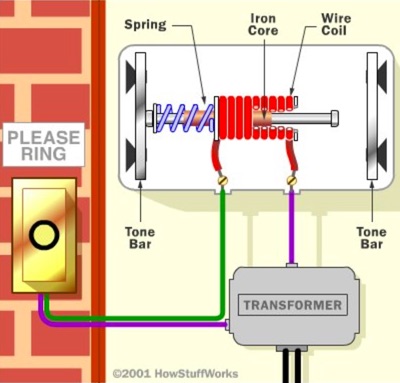
The key words here are "magnetic field" we can use this to get our notification!
In my case, I already have Home Assistant up and running with Z-Wave devices already tied in so this solution involves using a Z-Wave sensor, however you could easily do this with an Arduino and ESP8266 based devices (NodeMCU, Wemos D1, etc) and program that to send you a notification. There are also ways to convert the low voltage AC into 5vDC which you can use to power your microcontroller.
Before you do any work on your own home's electrical, be sure to turn off the breaker powering the circuit you are working on. Even if the Doorbell circuit is low voltage (~12-24VAC) Use common sense and be safe!
Z-Wave Door Sensors can be incredibly useful for monitoring just about anything. I've been picking up units by EcoLink for about $25 on Amazon. I like these a lot because they have a terminal connection inside intended for use with existing hardwired door sensors, but basically you can use it for anything as long as it will complete the circuit.
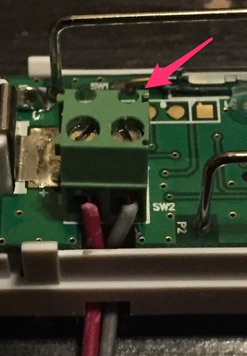
I went ahead and picked up a magnet reed sensor for about $2 on SparkFun and soldered it to two jumper leads I connected to the terminal contacts in the Z-Wave sensor.
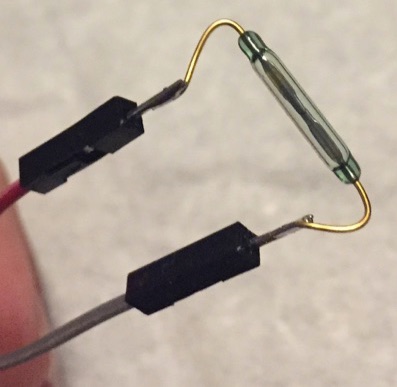
I'd also suggest putting some heat shrink on the exposed leads as well to prevent any short circuits.
Time to mount the sensor with the external reed sensor in the doorbell chime enclosure. Open up your enclosure and locate the electromagnetic coil- it will be where the plunger is that shoots up to hit the chime. In my case it was behind the terminal screw connections for the button.
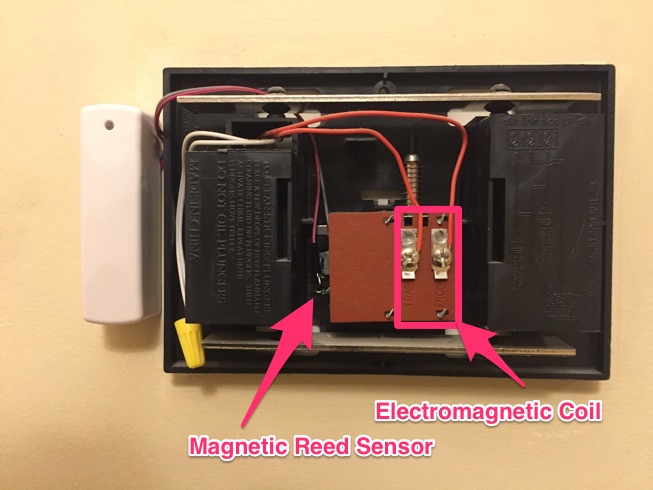
The idea here is to get the reed sensor close enough to pick up the magnetic field produced by the electromagnetic coil when the doorbell button is pressed and energizes the electromagnet. This will take some trial and error to find the best position of the sensor while allowing clearance for the plunger to strike the chimes. Be careful not to obstruct the plunger.
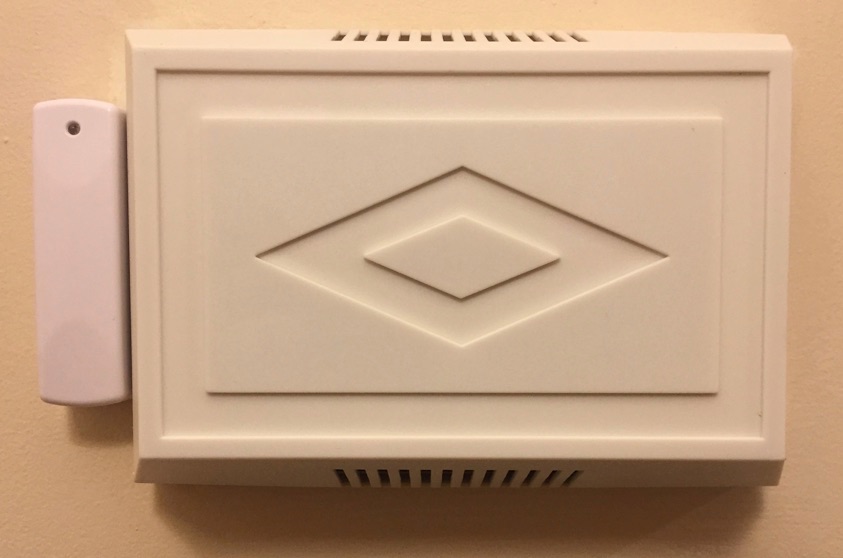
Go ahead and mount the Z-Wave Door Sensor as well. I used some 3M Command Strips to put it onto the wall next to the enclosure. Once you've got the sensor placed, put the cover back on. Here's what mine looks like with the sensor next to it:
Making it Smart
I use Home Assistant for all of my home automation and control needs. If you haven't heard of Home Assistant, it's pretty awesome and it supports a ton of stuff.
Let's start off by making a template sensor from the Door Sensor so we can tell what's going on. You'll want to first include the new Z-Wave sensor in your Z-Wave network first and find out it's entity ID in Home Assistant.
    sensor doorbell:
      - platform: template
        sensors:
          doorbellstate:
            value_template: '{% if is_state("binary_sensor.ecolink_doorwindow_sensor_sensor_1", "off")
             %}Ringing{% else
             %}Standby{% endif %}'
            friendly_name: 'Front Doorbell'
Basically we're telling Home Assistant to show Ringing whenever the door sensor is reporting an Off state. Else, the Doorbell is in standby. In this case, the magnetic reed sensor I have is normally closed (normally open would be more intuitive here).
If all goes well you'll have a new "Front Doorbell" sensor in Home Assistant with the state of "Standby".

Awesome! Let's make Home Assistant tell us when someone rings the doorbell. Make a new automation such as the following, but feel free to customize it as needed by adding conditions such as time of day or based on other sensors:
    automation:
      alias: Front Doorbell Notification
      trigger:
        platform: state
        entity_id: sensor.doorbellstate
        state: 'Ringing'
      action:
        service: notify.pushover
        data:
          title: Door Bell Notification!
          message: Someone is at the Door! DoorBell was pressed at {{now().strftime("%c")}}
In my case I wanted to be notified via Pushover whenever my doorbell was pressed (IE state of the sensor changes to "Ringing".)
Restart Home Assistant and go try out your new smarter doorbell! I need to go back and adjust some of my notification text formatting from when I got my first Pushover notification, but after your doorbell rings you should get a notification!

Check out my other posts on Home Automation and other Smart Home technologies here!
I Hope this helps someone out in making your doorbell a little smarter without breaking the bank!